Hello all,
I just ordered a Wicked Edge 130 with some extra accessories and am looking for any advice from those who use it to sharpen Spyderco knives. I’ve read the forums, watched the YouTube videos, and now just hoping to gain some additional knowledge. Thanks in advance! BTW, anyone have a spare couch I can sleep on? Because my wife is not going to be happy!
Spyderco sharpening advice from Wicked Edge owners
-
Soanso McMasters
- Member
- Posts: 557
- Joined: Thu Oct 07, 2021 3:07 am
-
yablanowitz
- Member
- Posts: 6945
- Joined: Sun Apr 09, 2006 2:16 pm
- Location: Liberal, Kansas
Re: Spyderco sharpening advice from Wicked Edge owners
You might shoot toxophilus a p.m. I believe that contraption he uses is a Wicked Edge of some description. I don't know about the couch, but he does have a camper. 

-
Whetstone39
- Member
- Posts: 6
- Joined: Thu Dec 09, 2021 7:19 pm
- Location: St. Louis, MO
Re: Spyderco sharpening advice from Wicked Edge owners
I have owned a WE for a few years, and can offer some advice. I mainly use mine to set the edge angle, which for me is 30 degrees inclusive for nearly everything. I take the edge from the 100 or 200 grit diamond stones through the 1000 grit diamond stone. I really like the edge a Sharpmaker can give you, so I then go through a 30 degree progression through the medium and fine SM stones, and depending on the knife may finish on the UF stones. This makes touch ups a breeze, and also means I don’t have to record the settings used to set the edge angle on the WE. A few tips:
1) If you haven’t ordered it or don’t have one, an angle cube or some other angle measuring device is pretty essential if you plan to re-profile a factory edge.
2) The diamonds from the factory do require a break in period, so sharpening a couple of kitchen knives first for example will take care of that.
3) Use light pressure, let the stones do the work.
4) Check your edge angle after the switching to a new grit, and frequently check your rods to ensure they haven’t loosened. You only need to make this mistake once lol, but it is a pain in the rear end if you don’t :)
5) Use the stones dry, if not slurry can cause scratches on the surface of the blade.
6) I use a sharpie to mark the edge, then use alternating swipes (left, right, repeat) until the sharpie is removed from both sides. Then switch to one side until a burr is formed. Then the other side until a burr is formed. Then 10 swipes on the side with the burr, then 10 swipes on the other side, then 9, then 8, etc., until I reach one. Then 20 swipes alternating one swipe left and one right, which should remove the burr. Then alternating strokes one left and one right through 1000 grit. (the number of swipes I wrote here is just an approximation, you will get a “feel” for when to progress).
7) As with all sharpening or specifically setting an edge angle, forming the initial burr is essential (for me anyway). Don’t move to a finer grit until you can feel the burr along the entire edge.
8) Keep the placement of the stones flat on the edge. This seems to be obvious but fatigue or moving too fast can cause you to not have the stone flat against the edge. When I was starting out I purposely moved very slow to ensure proper placement for each swipe.
If you have other questions I didn’t answer please let me know.
Kind regards,
Tom
Last edited by Whetstone39 on Sun Dec 26, 2021 4:11 pm, edited 1 time in total.
-
The Meat man
- Member
- Posts: 5860
- Joined: Wed Jan 03, 2018 8:01 pm
- Location: Missouri, USA
Re: Spyderco sharpening advice from Wicked Edge owners
Hey Soanso! Yes I have a WE130 as well. Let me just tell you that as gut-wrenchingly expensive as it is up front, you will not regret paying the price! It is the best system I have ever used.
One of the biggest advantages of the WE to systems like Edge Pro and Hapstone is the ability to alternate passes without touching or moving the knife. It means there's literally no limit to how refined your edge can get. You can use the lightest pressure and spend as much time as you want alternating passes, with 100% consistency. My Hapstone was a game-changer for me; the WE represents a huge leap forward from even the Hapstone.
I highly recommend WE diamond emulsion spray for stropping. It works FAR better than any other compound I've tried, including Gritomatic. Cuts very fast and will refine your edge delightfully. I use it routinely on my WE leather strops, which I always use freehand by the way.
I like to use a pen light to help me detect a burr when I'm finishing up. It's irritating to think you are done, unclamp the knife, only to see a tiny burr that takes time to strop away. Occasionally I will even pick up the entire setup, knife in clamp, and rotate it under the light to make absolutely sure I have removed the burr on both sides before unclamping. But you'll find that with the ability to do consistent alternate passes, getting rid of the burr is merely a matter of patience.
I also highly recommend you use the recording pages in the instruction booklet, writing down your angles, measurements, position, etc for each knife you sharpen. It will save you a lot of time when you need to resharpen.
Sometimes when you clamp a knife, it will be ever so slightly tilted to one side. This can cause the angles to seem like they suddenly changed from the previous sharpening. No biggie, I always just carefully twist the clamped blade until it is truly perpendicular again.
If you have any questions feel free to ask! Have fun with your new sharpener and be prepared for some incredible edges!
- Connor
"What is a man profited, if he shall gain the whole world, and lose his own soul?"
"What is a man profited, if he shall gain the whole world, and lose his own soul?"
-
Soanso McMasters
- Member
- Posts: 557
- Joined: Thu Oct 07, 2021 3:07 am
Re: Spyderco sharpening advice from Wicked Edge owners
Awesome thanks for the tips! I’m certain I’ll have some questions so I appreciate the offer.The Meat man wrote: ↑Fri Dec 24, 2021 5:05 pmHey Soanso! Yes I have a WE130 as well. Let me just tell you that as gut-wrenchingly expensive as it is up front, you will not regret paying the price! It is the best system I have ever used.
One of the biggest advantages of the WE to systems like Edge Pro and Hapstone is the ability to alternate passes without touching or moving the knife. It means there's literally no limit to how refined your edge can get. You can use the lightest pressure and spend as much time as you want alternating passes, with 100% consistency. My Hapstone was a game-changer for me; the WE represents a huge leap forward from even the Hapstone.
I highly recommend WE diamond emulsion spray for stropping. It works FAR better than any other compound I've tried, including Gritomatic. Cuts very fast and will refine your edge delightfully. I use it routinely on my WE leather strops, which I always use freehand by the way.
I like to use a pen light to help me detect a burr when I'm finishing up. It's irritating to think you are done, unclamp the knife, only to see a tiny burr that takes time to strop away. Occasionally I will even pick up the entire setup, knife in clamp, and rotate it under the light to make absolutely sure I have removed the burr on both sides before unclamping. But you'll find that with the ability to do consistent alternate passes, getting rid of the burr is merely a matter of patience.
I also highly recommend you use the recording pages in the instruction booklet, writing down your angles, measurements, position, etc for each knife you sharpen. It will save you a lot of time when you need to resharpen.
Sometimes when you clamp a knife, it will be ever so slightly tilted to one side. This can cause the angles to seem like they suddenly changed from the previous sharpening. No biggie, I always just carefully twist the clamped blade until it is truly perpendicular again.
If you have any questions feel free to ask! Have fun with your new sharpener and be prepared for some incredible edges!

Re: Spyderco sharpening advice from Wicked Edge owners
Hi Tom,
Welcome to our forum.
sal
Welcome to our forum.
sal
-
Soanso McMasters
- Member
- Posts: 557
- Joined: Thu Oct 07, 2021 3:07 am
Re: Spyderco sharpening advice from Wicked Edge owners
Thanks, I ordered the angle cube!Whetstone39 wrote: ↑Fri Dec 24, 2021 11:46 amI have owned a WE for a few years, and can offer some advice. I mainly use mine to set the edge angle, which for me is 30 degrees inclusive for nearly everything. I take the edge from the 100 or 200 grit diamond stones through the 1000 grit diamond stone. I really like the edge a Sharpmaker can give you, so I then go through a 30
degree progression through the medium and fine SM stones, and depending on the knife may finish on the UF stones. This makes touch ups a breeze, and also means I don’t have to record the settings used to set the edge angle on the WE. A few tips:
1) If you haven’t ordered it or don’t have one, and angle cube or some other angle measuring device is pretty essential if you plan to re-profile a factory edge.
2) The diamonds from the factory do require a break in period, so sharpening a couple of kitchen knives first for example will take care of that.
3) Use light pressure, let the stones do the work.
4) Check your edge angle after the switching to a new grit, and frequently check your rods to ensure they haven’t loosened. You only need to make this mistake once lol, but it is a pain in the rear end if you don’t :)
5) use the stones dry, if not the slurry can cause scratches on the surface of the blade.
6) I use a sharpie to mark the edge, then use alternating swipes (left, right, repeat) until the sharpie is removed from both sides. Then switch to one side until a burr is formed. Then the other side until a burr is formed. Then 10 swipes on the side with the burr, then 10 swipes on the other side, then 9, then 8, etc., until I reach one. Then 20 swipes alternating one swipe left and one right, which should remove the burr. Then alternating strokes one left and one right through 1000 grit. (the number of swipes I wrote here is just an approximation, you will get a “feel” for when to progress).
7) As with all sharpening or specifically setting an edge angle, forming the initial burr is essential (for me anyway). Don’t move to a finer grit until you can feel the burr along the entire edge.
8) Keep the placement of the stones flat on the edge. This seems to be obvious but fatigue or moving too fast can cause this to happen. When I was starting out I purposely moved very slow to ensure proper placement for each swipe.
If you have other questions I didn’t answer please let me know.
Kind regards,
Tom
-
Whetstone39
- Member
- Posts: 6
- Joined: Thu Dec 09, 2021 7:19 pm
- Location: St. Louis, MO
-
toxophilus

- Member
- Posts: 699
- Joined: Tue Feb 10, 2015 4:07 pm
- Location: Colorado; Earth
Re: Spyderco sharpening advice from Wicked Edge owners
Congratulations on your WE 130 Soanso! I hope the information below helps you as well as other users of the WE system 
One of the challenges I had to learn whether using an earlier style gen clamp or the 3rd gen clamp that I'm using now, is finding the true center of the blade edge in relation to how the clamp grabs the blade. Finding the true center of the blade will ensure that I end up with even bevels on my knives.
I favor Spyderco knives though I will use this method on other non-Spyderco knives as well. I found that even though I thought I had my knives clamped pretty straight the angle cube verified otherwise.
Below is the method I use (got it from gleaning other's WE forum posts); I'm no mathematician but this forced me to learn...
I use the AAG (Advanced Angle Guide) to record my settings as well as post them into the knife setting database on the WE website.
I'll use my Spyderco Para 3 as an example; here's how I do it to keep the bevels even:
I typically match the pre-existing grind angle on the LEFT side of the WE, in my case the angle was close to 18°; I then set the RIGHT side of the WE at 18° as well for a starting point.
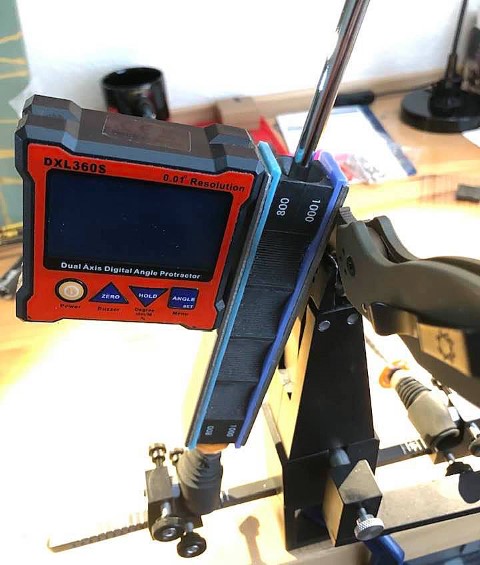
Using my angel cube (TIP; only use one single platen side to take your initial measurements on both sides of the blade, I used the 1K side) the Left side measured 17.70°; the Right side measured 18.43°
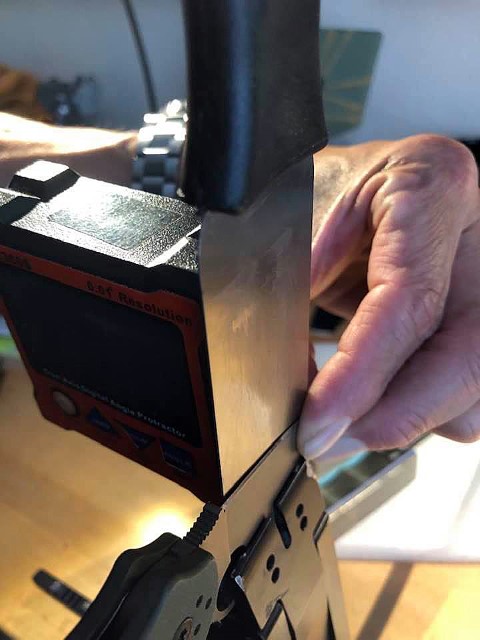
Next I take a 1.5" putty knife and butt the Angle cube up against it, I rest the putty knife & angle cube next to the blade on both Left & Right side and record the readings.
Think of the Left side of the WE as your positive side and the Right side as the Negative side (that's how I remember it in my mind).
On the Left I got a reading of 1.74° (positive); on the Right I got a reading of 2.81° (negative); Add the positive reading with the negative reading and I get 1.07°; next I divide this by 2 = .53°
Add .53 to the initial Left positive side reading 17.70 +.53 = 18.23°
Subtract .53 from the inital Right negative side reading 18.43 -.53 = 17.90°
I add these values together; 18.23 + 17.90= 36.13 inclusive; I divide this by two = 18.06° DPS
If you really want to get it to 18° per side, then subtract the .06 from both the Left & Right sides i.e.
Left; 18.23 -.06 = 18.17°
Right; 17.90 -.06=17.84
Adding these two values together= 36.01° then divide them by two you'll end up with 18.005° DPS
My settings for sharpening using the angle cube/1k platen side will be:
WE Left side; 18.17°
WE Right side; 17.84°
NOTE: I'm able to dial in my angles precisely with my setup (using the WE Field & Sport with adjustable pivots), I believe your WE 130 has the same adjustability.
As I stated earlier I do this so I can figure out what angles my platens should be set at so I can get even bevels on my folders, even though the Gen 3 is made to hold distally tapered blades better, they don't eliminate blade lean which can produce one bevel wider than the other. This is verified by your angle cube.
As you look down on the apex of the blade you should be able to see at the tip which side may need more grinding to get you to where you want to be, it may take more than one sharpening. I use the back of a business card (white background to view the apex at the tip of the blade).

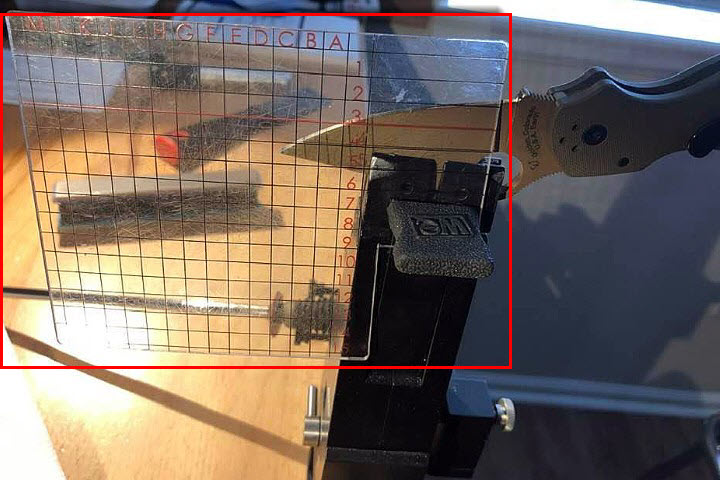
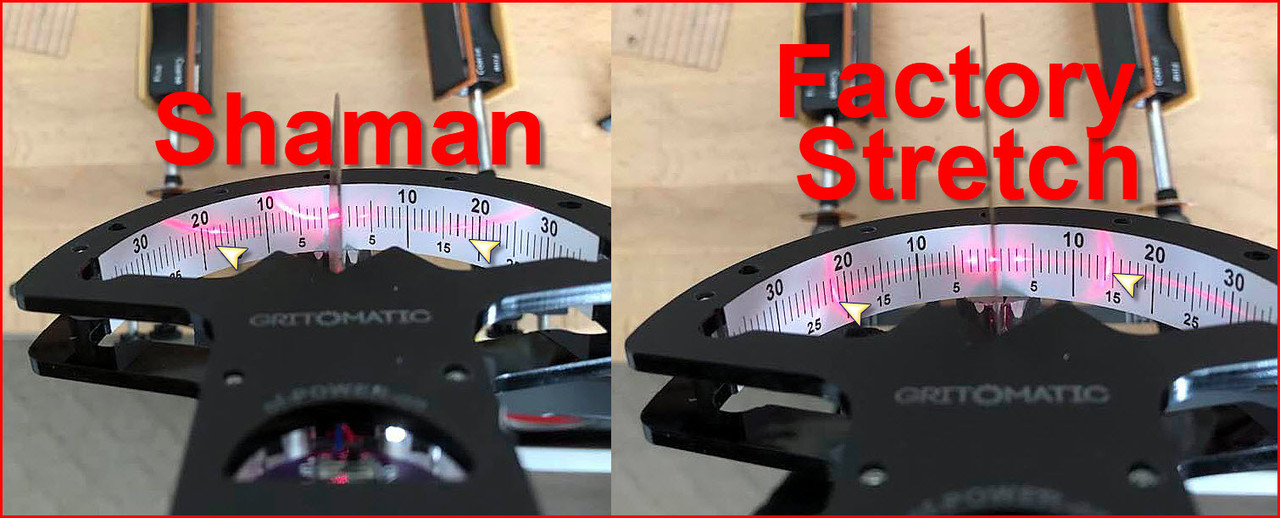
Goniometer: the image below illustrates a Spyderco factory blade for a carbon fiber Stretch model and a Shaman model that I sharpened using the process above; my goal for the Shaman was 18°DPS
I'm including a link to a video on finding the sweet spot, I use a rolled up hair-tie rubberband that I move up to find the sweet spot and can move down when its not in use.
Finding the Sweet Spot; https://photos.google.com/share/AF1QipM ... VPWkwxakFn
Here's another link to breaking in your stones; after reading this now days after I've done my initial sharpening I only do about 20 strokes per stone per side; Break-In Period and Lifespan of Wicked Edge Diamond Sharpening Stones;https://support.wickededgeusa.com/porta ... S25lIn0%3D
I've done some other mods to my Field & Sport model...
Regards, Fugi
One of the challenges I had to learn whether using an earlier style gen clamp or the 3rd gen clamp that I'm using now, is finding the true center of the blade edge in relation to how the clamp grabs the blade. Finding the true center of the blade will ensure that I end up with even bevels on my knives.
I favor Spyderco knives though I will use this method on other non-Spyderco knives as well. I found that even though I thought I had my knives clamped pretty straight the angle cube verified otherwise.
Below is the method I use (got it from gleaning other's WE forum posts); I'm no mathematician but this forced me to learn...
I use the AAG (Advanced Angle Guide) to record my settings as well as post them into the knife setting database on the WE website.
I'll use my Spyderco Para 3 as an example; here's how I do it to keep the bevels even:
I typically match the pre-existing grind angle on the LEFT side of the WE, in my case the angle was close to 18°; I then set the RIGHT side of the WE at 18° as well for a starting point.
Using my angel cube (TIP; only use one single platen side to take your initial measurements on both sides of the blade, I used the 1K side) the Left side measured 17.70°; the Right side measured 18.43°
Next I take a 1.5" putty knife and butt the Angle cube up against it, I rest the putty knife & angle cube next to the blade on both Left & Right side and record the readings.
Think of the Left side of the WE as your positive side and the Right side as the Negative side (that's how I remember it in my mind).
On the Left I got a reading of 1.74° (positive); on the Right I got a reading of 2.81° (negative); Add the positive reading with the negative reading and I get 1.07°; next I divide this by 2 = .53°
Add .53 to the initial Left positive side reading 17.70 +.53 = 18.23°
Subtract .53 from the inital Right negative side reading 18.43 -.53 = 17.90°
I add these values together; 18.23 + 17.90= 36.13 inclusive; I divide this by two = 18.06° DPS
If you really want to get it to 18° per side, then subtract the .06 from both the Left & Right sides i.e.
Left; 18.23 -.06 = 18.17°
Right; 17.90 -.06=17.84
Adding these two values together= 36.01° then divide them by two you'll end up with 18.005° DPS
My settings for sharpening using the angle cube/1k platen side will be:
WE Left side; 18.17°
WE Right side; 17.84°
NOTE: I'm able to dial in my angles precisely with my setup (using the WE Field & Sport with adjustable pivots), I believe your WE 130 has the same adjustability.
As I stated earlier I do this so I can figure out what angles my platens should be set at so I can get even bevels on my folders, even though the Gen 3 is made to hold distally tapered blades better, they don't eliminate blade lean which can produce one bevel wider than the other. This is verified by your angle cube.
As you look down on the apex of the blade you should be able to see at the tip which side may need more grinding to get you to where you want to be, it may take more than one sharpening. I use the back of a business card (white background to view the apex at the tip of the blade).
Goniometer: the image below illustrates a Spyderco factory blade for a carbon fiber Stretch model and a Shaman model that I sharpened using the process above; my goal for the Shaman was 18°DPS
I'm including a link to a video on finding the sweet spot, I use a rolled up hair-tie rubberband that I move up to find the sweet spot and can move down when its not in use.
Finding the Sweet Spot; https://photos.google.com/share/AF1QipM ... VPWkwxakFn
Here's another link to breaking in your stones; after reading this now days after I've done my initial sharpening I only do about 20 strokes per stone per side; Break-In Period and Lifespan of Wicked Edge Diamond Sharpening Stones;https://support.wickededgeusa.com/porta ... S25lIn0%3D
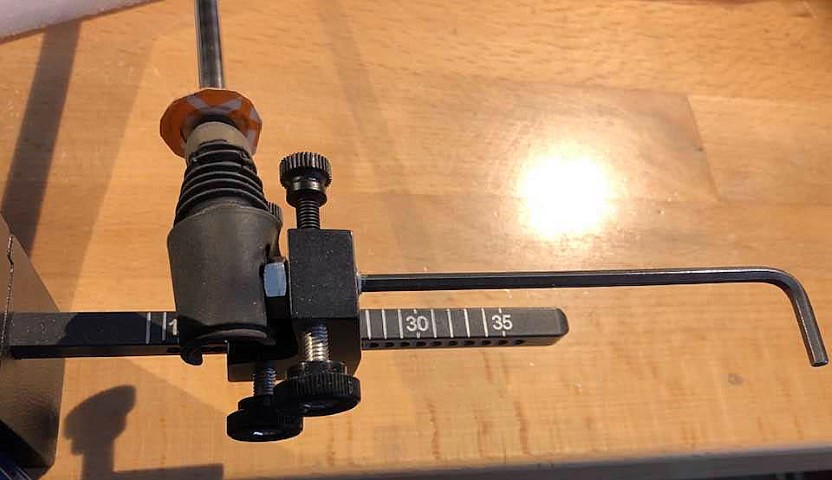
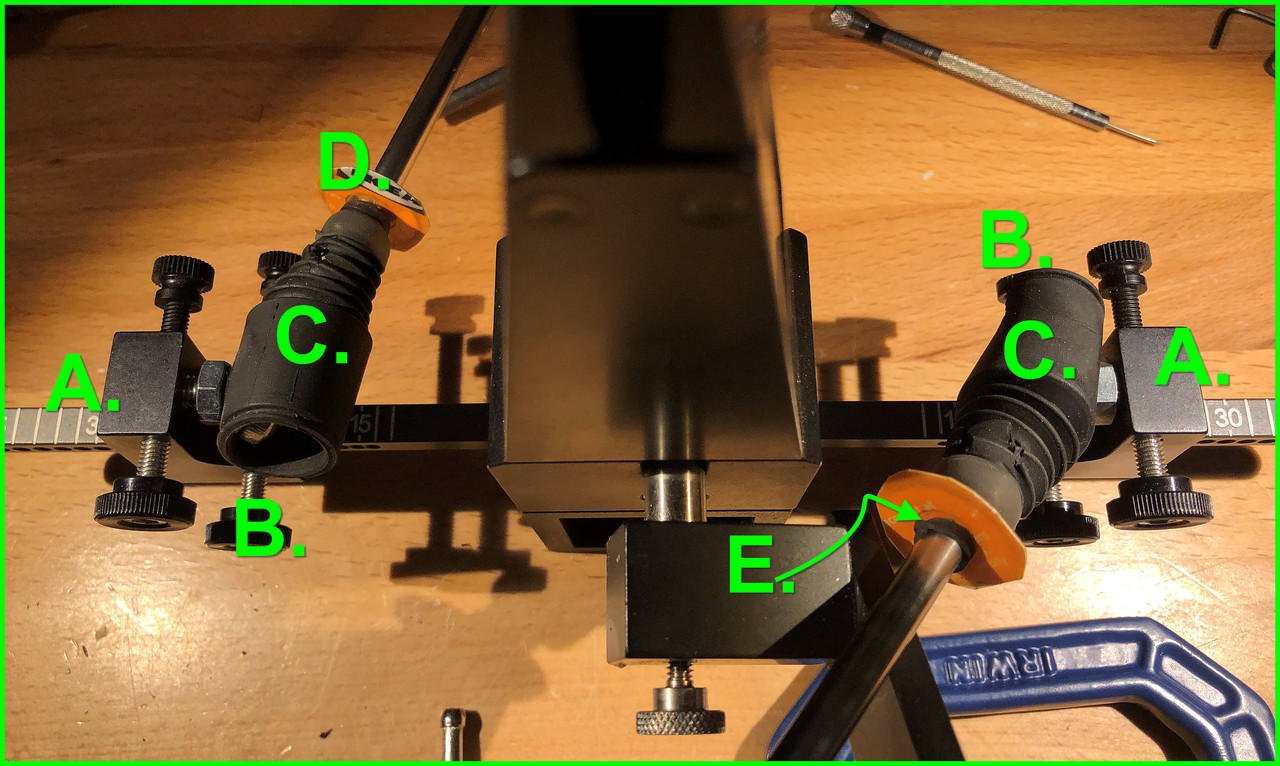
I've done some other mods to my Field & Sport model...
- A. & B. Added telescope knobs on the opposite sides of the thumb screws to hold everything secure
- C. Added RC axle dust covers to minimize dust from the blade steel collecting in the rod bearings
- D. Cut up an Ikea card as well as slip a rubber grommet under it to minimize platen impact
- E. Added the rolled up hair tie rubber band to find the sweet spot
Regards, Fugi
-
Soanso McMasters
- Member
- Posts: 557
- Joined: Thu Oct 07, 2021 3:07 am
Re: Spyderco sharpening advice from Wicked Edge owners
Wow thanks for the in depth write up!
Re: Spyderco sharpening advice from Wicked Edge owners
I am a fan of using the angle cube to get angles as symetrical as possible; glad to see you added this to your set-up.
I start out with the angle cube on the base to see how level it is. It is usually off a little so I use manila file folders to prop up one side of the base to level. After that, I check the angle with the diamond stone against the blade as pictured/outlined above and get it as close to the same angle as possible.
Also, the advice to check the thumbscrew that holds the rod angle in place is a good one. I try to remember to do this as I switch to the next grit stone. I've had a couple of incidents where the set screw came loose and it does mess up the sharpening effort.
I'm still working on positioning the blade in the clamp for maximum even bevel along the edge - meaning the bevel isn't taller at the tip or back of the blade and shorter thru the midsection.
There is a lot out there in youtube videos; technique varies widely among users. It is nice to hear and see what others are doing but I suspect you will develop your own in time.
Also agree that swallowing the initial cost is a tough one, but after doing so I am not regretting it. I've added to my base set-up over time to help spread the cost out. I'd suggest using what you got first and seeing what you may want to add, if anything; vs seeing all that is available and trying to acquire it all. I've dabbled some in the ultra fine grits, but find I'm fine with sticking to the grit levels of the diamond stones.
You will in time learn some of the limitations of the clamp system, like blades that don't stick above the clamp very much and very tall bevels can't be done as the stone hits the side of the clamp and can't contact the edge of the blade. (There are some workarounds if you have to go there but they may require the purchase of another piece).
Enjoy!
So many knives - so little funds!!!