Now let me first say that I know most people don't have a problem with the press-fit lanyard tube in the new manix 2. The knife is personally my all-time favourite, as I tend to prioritize versatility, and I feel the M2 is an *extremely* versatile blade.
One rather consistent criticism that I've heard floating around forums and reviews is the press-fit lanyard tube at the butt-end of the knife. Some worry that it may loosen over time with hard use, and a few have already had that happen.
When I first got my S90V/CF M2, part of the scale was actually lifted off from the lanyard tube, but fit back snugly when I pushed it back down. It has since loosened up, and you can hear it clicking in and out of place when you squeeze the scales together.
I know WR will likely cover it, but a recent debacle with Aus customs over here (that I've been muttering about for a month) makes me a bit worried about sending the knife out of the country for repair. I can stand to loose a low-end Benchmade. I'd rather not lose this little baby :D
Anyway, my initial fix was to replace the clip screws with 3/8" #2-56 screws, and run them across into the opposite clip holes. That effectively pinched the liners together, but didn't do anything for the CF scale on the other side. Had to put an additional screw from that side to clamp the scale to the liner.
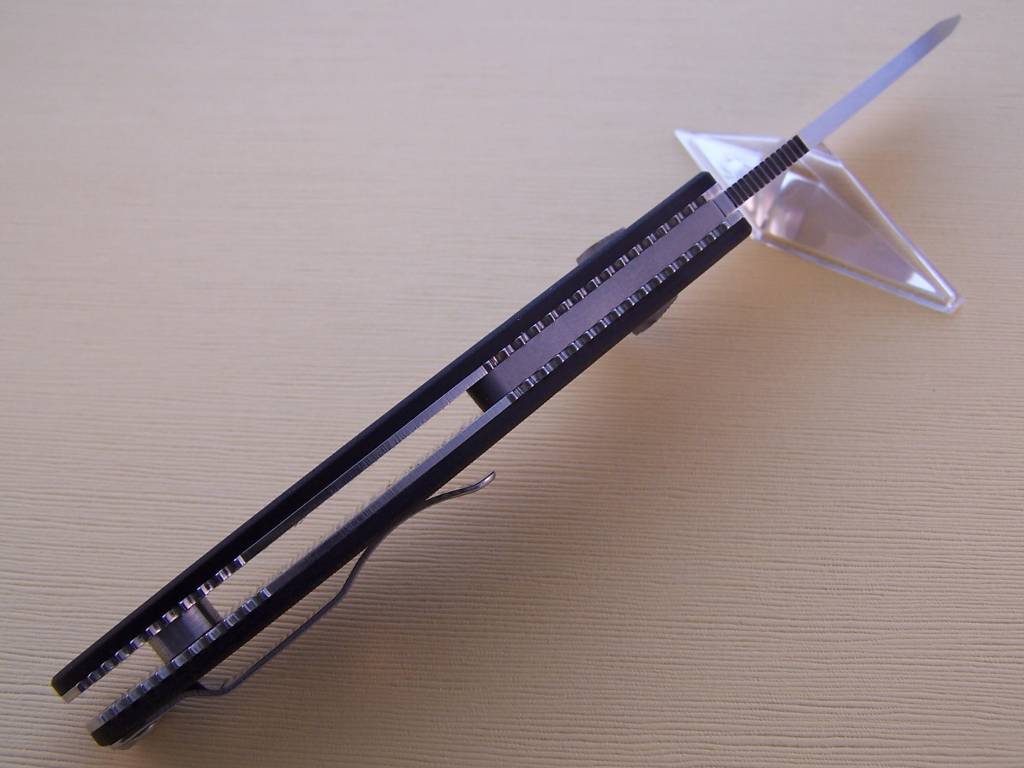
Was a bit worried about shear stress on the screws, so decided to look for something a bit more robust(and nicer looking!). Finally figured out to put a 'generic' standoff/spacer in between one pair of clip screw holes, with a screw coming in from each side. This effectively clamped down the scales and liners from both sides using only one pair of clip holes, and brought the liners flush again. It also seems to add some rigidity to the back end of the M2, and doesn't look too out of place!
Sorry about the picture quality - I only have a phone camera, and even then, it's a Nokia E71, which is BAD, even as far as cell cameras go...
And yes, that *is* a rolling pin on the floor in the background :P
Manix 2 Lanyard tube 'fix'
-
jylong_away
- Member
- Posts: 124
- Joined: Fri Aug 28, 2009 9:12 am
Manix 2 Lanyard tube 'fix'
- Attachments
-
- 03102009077.jpg (52.91 KiB) Viewed 7843 times
-
- 03102009079.jpg (52.19 KiB) Viewed 7902 times
-
- 03102009078.jpg (53.42 KiB) Viewed 8000 times
Looks good i don't have this problem with my CF manix 2 but i have it with my regular manix2 but then again i took it apart as well so i kinda forced it out but your fix looks nice and is something that is needed i was thinking about doing it too eventually just my 154CM manix2 doesn't see much pocket time now that i can't live without my S90V manix 2
One thing I found with my M2 s90v was that there was a gap between the CF and liner, so I took it apart and found there was steel dollops where the laser cutter had finished it's cut on each lightening hole, holding out the scale.
I took to the liner with a diamond stone and now everything is fitting together nice, tight and gap free.
I took to the liner with a diamond stone and now everything is fitting together nice, tight and gap free.
-
jylong_away
- Member
- Posts: 124
- Joined: Fri Aug 28, 2009 9:12 am
I noticed that too, but it didn't seem to cause as much of a problem with my liner/scale contact.
Another thing I'm thinking of trying is clamping the lanyard tube with a Chicago screw through it. Had a couple handy and it does fit in terms of sitting well against the scale, but the ones I have are too short! Needa source some 12mm or 3/8" chicagos.
Jim - Any idea where a good place would be to get some locally? (in packs of less than 100....)
-
The Deacon

- Member
- Posts: 25717
- Joined: Fri Sep 24, 2004 10:33 am
- Location: Upstate SC, USA
- Contact:
Tack shops and stationers might be worth trying. The two main uses of Chicago screws, at least here in the States, are saddlery/tack and as binding post screws for ledgers and such. The more I look at the Manix 2, the less I understand why there is no backstrap or rear standoff, other than the friction fit lanyard tube.
Paul
My Personal Website ---- Beginners Guide to Spyderco Collecting ---- Spydiewiki
Deplorable :p
WTC # 1458 - 1504 - 1508 - Never Forget, Never Forgive!
My Personal Website ---- Beginners Guide to Spyderco Collecting ---- Spydiewiki
Deplorable :p
WTC # 1458 - 1504 - 1508 - Never Forget, Never Forgive!
-
jylong_away
- Member
- Posts: 124
- Joined: Fri Aug 28, 2009 9:12 am
Thanks for that. Googled a bit and finally found a specialty craft store that might carry 'em...and they open sundays! Fingers crossed they have a 3/8" or 12mm version.The Deacon wrote:Tack shops and stationers might be worth trying. The two main uses of Chicago screws, at least here in the States, are saddlery/tack and as binding post screws for ledgers and such. The more I look at the Manix 2, the less I understand why there is no backstrap or rear standoff, other than the friction fit lanyard tube.
Totally agree with you on the standoff issue. I feel the M2 has lots of benefits in and of itself, as well as compared to the Mini Manix, but I'm a fan of all-screw construction. That plus the fact that the M2 CF/S90V is going to be my last knife purchase for a *very* long time. Have to wean off the addiction a bit :D (I know, promises, promises). I'm hoping that at least one of these 'solutions' will be good enough for a permanent fix, and then it'll last FOR-EVA!! Muahaha! :P
I'm leaning towards using the 'chicago fix' because the standoff that I posted is a bit problematic with regards to perfect fit. A .156 spacer will sit flush against both liners, but is a tad too wide. If you grind it down a bit, it will be OK in terms of width, but there will be a tiny gap between the edge of the standoff and one of the liners. Think it's because both the screw holes and the Standoffs are threaded, which is usually not the case for production knife standoffs. I suppose I could try and intentionally strip one of the clip screw holes, but then I'd rather not burn bridges if I can help it.
Let's see what tomorrow brings, then :)
If you have no luck at your craft store try here
http://www.knivesaustralia.com.au/supplies.html
They sell 3/8" and 1/2" chicago screws, scroll down to sheath and pouch materials. Let us know how you go.
http://www.knivesaustralia.com.au/supplies.html
They sell 3/8" and 1/2" chicago screws, scroll down to sheath and pouch materials. Let us know how you go.

-
SimpleIsGood229

- Member
- Posts: 1485
- Joined: Sun Jul 08, 2007 3:23 pm
- Location: Republic of Texas, with my C95
-
jylong_away
- Member
- Posts: 124
- Joined: Fri Aug 28, 2009 9:12 am
Alrighty, so I've gotten a 10mm chicago screw, and it clamps down nicely through the lanyard hole, eliminating any play. Have left the standoff in place, attached by the clip screw from only one side because the chicago screw was still allowing compression/flexing of the liners at the butt-end of the knife.
It also occured to me that a bushing of sorts(similar to the pivot bushings on the leafstorm and CRK Seb) might be good around the post of the Chicago screw, to keep it centered. Have measured, and the OD and ID would be .250" and .200" respectively. Anyone know where to find something like that? Have browsed the online knife supply stores, with no success, and even the local hardware 'megastore' has nothing of the sort.
I suppose I could try wrapping it in duct tape...
-
The Deacon
- Member
- Posts: 25717
- Joined: Fri Sep 24, 2004 10:33 am
- Location: Upstate SC, USA
- Contact:
If all it needs to do is keep the screw centered in the lanyard tube, then plastic tubing, either rigid or flexible might work. Hobby shops that cater to railroad models would be one source for the rigid, pet shops that sell aquarium supplies and hobby shops that carry RC aircraft and boats might be good for the flex. The rigid, if you can find it, might be best, as it could be sanded down and/or drilled out if needed. Most RR oriented hobby shops here carry this stuff http://www.plastruct.com/
Paul
My Personal Website ---- Beginners Guide to Spyderco Collecting ---- Spydiewiki
Deplorable :p
WTC # 1458 - 1504 - 1508 - Never Forget, Never Forgive!
My Personal Website ---- Beginners Guide to Spyderco Collecting ---- Spydiewiki
Deplorable :p
WTC # 1458 - 1504 - 1508 - Never Forget, Never Forgive!
-
Geoff in Philly
- Member
- Posts: 25
- Joined: Tue Oct 04, 2005 10:54 am
-
jylong_away
- Member
- Posts: 124
- Joined: Fri Aug 28, 2009 9:12 am
I initially tried some 3/8" 2-56 screws and worked my way through a few things. 2 screws across 2 pairs of holes is probably the best overall, I found(hole nearest the spine, and middle hole). If you put one in the hole nearest the blade, it's ok when it's closed and 'resting', but I found that if you pull the ball lock all the way open, and squeeze on the blade, it drops a fraction more, and hits that screw.Geoff in Philly wrote:This problem has plagued me too.
Jylong away did you try using two 2-56 screws through 2 clip holes, one from each side?
Would 3 work even if not pretty?
The other thing to consider is that the lanyard tube is friction fit to the scale only - not the liners. So if the non-clip side is loose, the screws coming from the clip side will only pull on the liner, leaving the scale loose. This can be solved by putting a short screw into the remaining clip hole on that side, to clamp the scale down to the liner.
The biggest worry I had with that method was shear stress on the screws. I'm no engineer by any means, but they seemed just a bit too thin when I looked at them. Was concerned that if too much flex was placed on the butt end of the knife, things might start to crack or de-thread. But then I'm paranoid... :p
Putting a spacer with a screw from each side solved most of those problems, but had it's own problems with regards to sizing the spacer correctly. The gap between the scales is somewhere about .150", but the spacers I had are .156", and if you grind them down too much, the screw threads from the scale-to-spacer-to-scale don't match, and you get a gap.
My current 'final' fix is in the attachment. I use the Chicago screw with some tape around the post bit, to 'fatten' it up and have it snug in the lanyard tube(thanks, Deacon for the link - have to look into that). This keeps the liners squeezed nice and tight, and applies the force along the exact same axis as the original lanyard tube. It however didn't prevent the 'flex' of the liners if you squeezed hard enough on the butt end, as the original lanyard tube also didn't
To fix that, I ground down the backspacer to .150", and attached it using only *one* clip screw, so that thread matching wasn't an issue, and it sat flush against both liners.
Now that I've got what seems to be a solid fix for this, I'll probably start thinking about a wave mod for the blade. I know, I know...I'm violating a LE S90V M2... :p
- Attachments
-
- 05102009082.jpg (32.98 KiB) Viewed 7560 times
-
- 05102009081.jpg (32.2 KiB) Viewed 7597 times
-
Geoff in Philly
- Member
- Posts: 25
- Joined: Tue Oct 04, 2005 10:54 am
thanks.
that looks quite solid.
my issue is that I need the lanyard hole to stay open.
I think that if the screws run from liner to liner through the scales, there really shouldn't be too much stress on them. Just consider that they are there just to snug the liners onto the tube and the screws aren't really near a fulcrum point...no?
-
jylong_away
- Member
- Posts: 124
- Joined: Fri Aug 28, 2009 9:12 am
Heh..I'll be honest, I don't really know :p just figured something more robust would do better, but you're probably right. couple of long screws from the clip side n one short screw from the other side to clamp that scale to the liner worked pretty well for me when I started.Geoff in Philly wrote:thanks.
that looks quite solid.
my issue is that I need the lanyard hole to stay open.
I think that if the screws run from liner to liner through the scales, there really shouldn't be too much stress on them. Just consider that they are there just to snug the liners onto the tube and the screws aren't really near a fulcrum point...no?
-
peacefuljeffrey

- Member
- Posts: 1192
- Joined: Wed Jun 07, 2006 11:42 am
I am very interested in a Manix 2, but I don't plan to buy one until/unless I find out that this is fixed at the factory level. I am not interested in buying the knife and then having to immediately do some sort of retrofit on it.
Did I read somewhere on this forum that Spyderco was going to be addressing this? I'm feeling pretty glad that I found out about this flaw before I got myself one... Is there a reason for the design being what it is to allow for this to go on?
I would appreciate it if anyone could provide, or link to, pictures of what this knife looks like in its native state--all the better if a description of exactly what goes wrong with the fit of this tube is included. Thanks!
"Within this frame an ocean swells -- behind the smile -- I know it well..."
-
The Deacon
- Member
- Posts: 25717
- Joined: Fri Sep 24, 2004 10:33 am
- Location: Upstate SC, USA
- Contact:
Not sure what you mean by "native state" but here's a top view of an unaltered Manix 2...peacefuljeffrey wrote:I would appreciate it if anyone could provide, or link to, pictures of what this knife looks like in its native state--all the better if a description of exactly what goes wrong with the fit of this tube is included. Thanks!
[CENTER]
 [/CENTER]
Paul
My Personal Website ---- Beginners Guide to Spyderco Collecting ---- Spydiewiki
Deplorable :p
WTC # 1458 - 1504 - 1508 - Never Forget, Never Forgive!
My Personal Website ---- Beginners Guide to Spyderco Collecting ---- Spydiewiki
Deplorable :p
WTC # 1458 - 1504 - 1508 - Never Forget, Never Forgive!
I assume by "native state" you mean unaltered from the factory. As you can see in Deacon's picture above, the only thing holding the knife together at the bottom is the lanyard tube.peacefuljeffrey wrote:I am very interested in a Manix 2, but I don't plan to buy one until/unless I find out that this is fixed at the factory level. I am not interested in buying the knife and then having to immediately do some sort of retrofit on it.
Did I read somewhere on this forum that Spyderco was going to be addressing this? I'm feeling pretty glad that I found out about this flaw before I got myself one... Is there a reason for the design being what it is to allow for this to go on?
I would appreciate it if anyone could provide, or link to, pictures of what this knife looks like in its native state--all the better if a description of exactly what goes wrong with the fit of this tube is included. Thanks!
I agree with you, I'll certainly be getting a Manix 2, but only if they fix this problem at the factory.
-
spoonrobot

- Member
- Posts: 855
- Joined: Sat Jun 23, 2007 10:37 am
- Location: Rome, Georgia USA
I'm unconvinced it's an actual problem with the design.
There are several models that share the same press-fit tube and have never been mentioned as being problematic. I'll reserve judgment until we get some more reports from the field. So far we just have this one, which looks more like a production error (sounds like the flaring process wasn't done correctly) than failure from use.
There are several models that share the same press-fit tube and have never been mentioned as being problematic. I'll reserve judgment until we get some more reports from the field. So far we just have this one, which looks more like a production error (sounds like the flaring process wasn't done correctly) than failure from use.